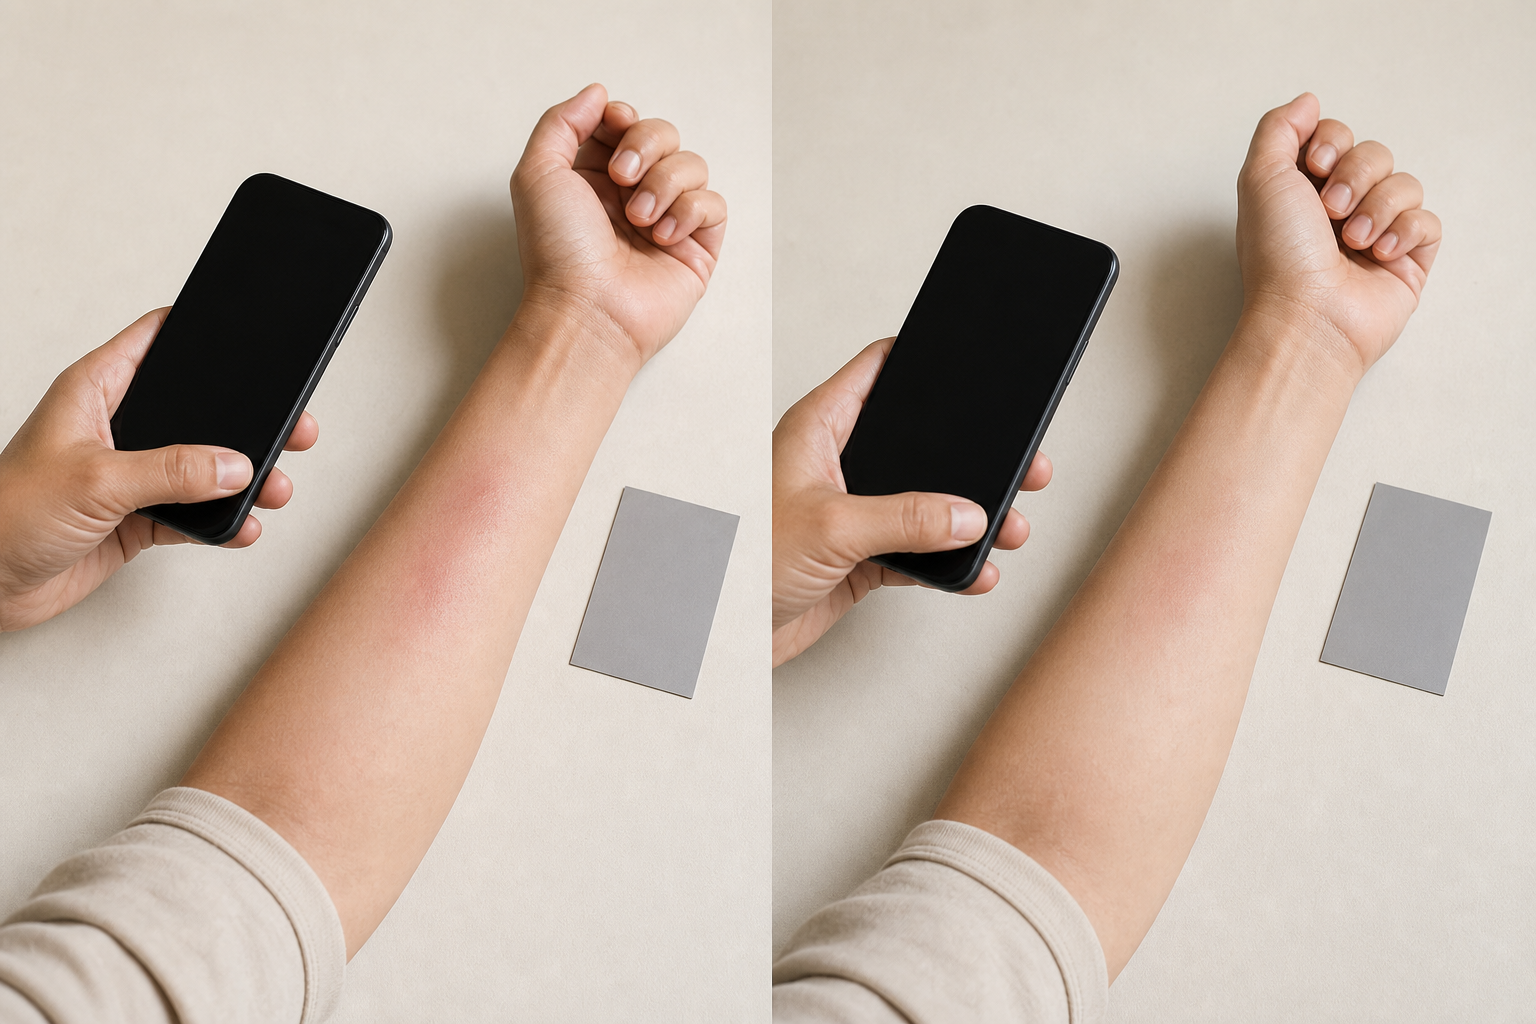
To take consistent photo notes of a visible symptom over time, decide on one repeatable setup before the first photo: the same camera, orientation, approximate distance, angle, background, lighting arrangement and neutral size reference. Photograph the same body area without changing the framing unnecessarily. For every image, record the date and time, the setup used, what is directly visible and any reason the setup differed. Retake an image when blur, glare, shadows, cropping or a displaced reference makes comparison difficult. Keep the original if it documents what happened, but label it “not comparable”. Use the series to organise observations for later review—not to identify a condition, prove a cause or decide whether care is needed.
The FRAME repeat-photo protocol
Consistency is not the same as photographic perfection. The goal is to reduce avoidable differences so that a later viewer can tell which changes belong to the setup and which observations remain uncertain. Use FRAME as a five-part protocol.
F — First check consent, privacy and purpose
Before opening the camera, decide why you are making the note. A useful purpose is narrow: “create a dated visual record of this visible area for my own notes” or “prepare an organised series to show a healthcare professional”. Do not set a purpose such as “confirm that this is improving”; that invites interpretation before the record exists.
If another person appears in the image, obtain their permission before photographing or saving it. For a child or someone who cannot provide consent, follow the appropriate consent and safeguarding expectations for your situation. Exclude faces, identity documents, names, location clues and unrelated body areas unless they are genuinely needed. Check who can access the device and where copies may go if you export, back up or share them.
Do not let this setup routine delay a request for professional or emergency help. A journal is not an emergency monitor.
R — Record a fixed setup card
Write one short “setup card” and reuse it. It should contain enough detail to reconstruct the arrangement without pretending to be a clinical photography standard.
- Device and lens: for example, “rear main camera; no zoom”.
- Orientation: portrait or landscape, kept the same.
- Camera position: approximate distance and angle relative to the visible area.
- Framing landmarks: two stable, non-sensitive visual landmarks that should remain at the same edges of the frame.
- Lighting arrangement: where the light comes from and whether flash is off or on.
- Background: a plain, repeatable background where practical.
- Neutral reference: the same clean, non-identifying object, placed beside the area without covering or pressing it.
- Body position: sitting, standing or lying down, with the body area in a repeatable position.
The reference is a consistency cue, not a measuring instrument. Do not place an object on broken or sensitive skin, and do not distort the visible area merely to fit the frame.
A — Acquire a small, controlled set
Take one overview image that shows the selected landmarks and one closer image only if the closer view adds useful visible detail. Keep that sequence stable on later dates. More images are not automatically more useful; an uncontrolled collection can make it harder to identify which views correspond.
Before pressing the shutter:
- Clean the camera lens if it is visibly marked.
- Recreate the body position and background from the setup card.
- Put the neutral reference in the same plane and approximate position, without touching a sensitive area.
- Align the same landmarks with the frame edges.
- Hold the camera at the recorded approximate distance and angle.
- Check that the area is not hidden by shadow, glare, hair, clothing or the reference.
- Take the planned overview and close view without applying filters or appearance-changing edits.
Keep the unedited image. Cropping a duplicate for convenience is less confusing if the original remains available and the cropped version is labelled.
M — Match the image with observable context
An image without context leaves basic questions unanswered. Pair every photo with a dated note using the same fields:
Captured: date, local time and time zone if travel matters View: overview or close view Setup: standard / changed Visible observation: colour, shape, surface appearance and location in neutral language Difference from setup card: none, or a precise change Relevant context entered by the person: only concrete events or actions they want recorded Comparison status: comparable / usable with caution / not comparable Question for a professional: optional; phrased as a question, not a conclusion
Describe only what the image and your direct observation support. “A red-toned patch is visible near the outer edge” is an observation. “The treatment is working” and “this food caused it” are conclusions the photo series cannot establish.
E — Evaluate comparability, then escalate questions appropriately
Review capture quality immediately, before the setup is dismantled. The test is not “Does this look better or worse?” It is “Can this image be matched to the standard view without a major setup difference?” Use the decision table below. If the answer raises a medical, diagnostic or urgency question, move that question out of the photo-quality test and to an appropriate healthcare professional.
Pass, caution or retake: the comparability decision table
| Check | Pass | Use with caution | Retake now if practical |
|---|---|---|---|
| Identity and consent | Only the intended area is shown; permission is settled | An unnecessary identifying detail is present but a safer crop can be made from a duplicate | Consent is absent or the image exposes details that should not be recorded |
| Focus | The intended area and reference are clear | Minor softness does not hide the intended area | Blur prevents the edges or surface from being seen |
| Framing | The same landmarks and view are present | One landmark differs, but the view can still be matched | The body area or planned reference is cropped out |
| Angle and distance | They approximately match the setup card | A small mismatch is documented | Perspective is substantially different and may dominate comparison |
| Light | The intended area is visible without dominant glare or shadow | Light differs, but the area remains visible and the difference is recorded | Glare, shadow or colour cast obscures the intended view |
| Reference | The same neutral reference is visible in the planned position | It is present but displaced; document that | It is absent when the standard view depends on it |
| Context note | Date, view, setup status and observation are recorded | One non-critical field is missing and marked unknown | The photo cannot be assigned to a reliable date or view |
A retake is about capture quality only. It is not a reason to wait before seeking help. If a retake is impossible, keep the image if you want the record, label the exact problem and avoid presenting it as directly comparable.
Example: two photo notes, one comparable and one not comparable
This fictional example shows the method without interpreting the symptom.
Setup card
- Rear main camera, no zoom, portrait orientation
- Camera approximately one forearm’s length from the outer left forearm
- Wrist crease near the lower frame edge; elbow direction at the upper edge
- Seated beside the same window with the room light off and flash off
- Plain grey cloth behind the arm
- Same clean, plain reference card beside—not on—the visible area
- Overview followed by close view
Entry A — comparable
Captured: 28 July 2026, 08:10 local time View: overview and close view Setup: standard Visible observation: a pink-toned, roughly oval area is visible on the outer left forearm; the surface appears dry in the close view Difference from setup card: none noticed Context: recorded after washing and before applying anything to the area Comparison status: comparable Question: none entered
This passes because the planned views, landmarks, reference, lighting arrangement and context fields are present. “Comparable” means the capture followed the protocol; it says nothing about diagnosis or change.
Entry B — not comparable
Captured: 30 July 2026, 21:35 local time View: close view only Setup: changed Visible observation: a pink-toned area is visible, but one edge is outside the frame and glare crosses the centre Difference from setup card: different room, overhead light, flash on, camera much closer, no reference card Context: no additional context recorded Comparison status: not comparable Question for a professional: what information would be useful to bring to an appointment?
This entry can remain in the chronology, but it should not be treated as a direct visual match to Entry A. If the setup is still available, a replacement can be taken and linked to the same date and time. The original should not be silently relabelled or edited to appear standard.
Implementation steps for a repeatable photo-note series
1. Define the series before the first capture
Give the series a neutral name such as “outer left forearm photo notes”. State the purpose, the intended body area and the two planned views. Avoid a diagnosis in the series name unless a healthcare professional has already provided it and using that term is useful to your records.
2. Create and test the setup card
Take a practice photo, then leave the location and try to recreate it from the card. If you cannot reproduce the view, add clearer landmarks or simpler positioning instructions. Delete the practice image if you do not need it.
3. Use a pre-capture checklist
Before each session, check:
- [ ] Photographing now will not delay needed professional or emergency help.
- [ ] Consent is settled for everyone represented.
- [ ] Unnecessary identifying details are outside the frame.
- [ ] The same device, lens, orientation and planned views are selected.
- [ ] Body position, background, light direction, angle and distance follow the setup card.
- [ ] The neutral reference is clean, unchanged and safely positioned.
- [ ] No filter or appearance-changing edit is active.
4. Run the immediate quality check
Inspect focus, framing, angle, light and reference position while a retake is still easy. Choose one label from the table: comparable, usable with caution or not comparable. Record the reason whenever the label is not “comparable”. Do not delete an image merely because it does not appear to show the change you expected.
5. Attach a context note on the same date
Complete the context template promptly so you do not have to reconstruct basic details later. Preserve uncertainty with “unknown” rather than filling a gap from memory. Keep observable description separate from possible explanations and questions.
If you use Genetiqo Vault, photo notes are an optional Pro feature and can be added to dated journal entries. Public product information says entries remain in the app on the iPhone unless the user explicitly exports or shares a file. For broader non-diagnostic record workflows, see the Genetiqo Vault journal guides. Review what an image reveals before adding, exporting or sharing it.
6. Review the series by pairs, not impressions
When looking back, first compare the metadata and setup labels. Pair overview with overview and close view with close view. Place a “changed setup” note between images that should not be compared directly. Write down questions instead of turning visual impressions into conclusions.
7. Prepare a bounded set for another person
If you choose to show the record to a healthcare professional, select the relevant date range and retain dates, view labels and setup exceptions. Remove unrelated images and review each file for identifying or private background details. Ask the recipient how they prefer to receive information; do not assume an ordinary message or shared album is appropriate for sensitive material.
Limitations
A controlled setup reduces avoidable variation; it does not eliminate it. Cameras may process colour and exposure differently, daylight changes, bodies move, and a neutral reference may shift. Even a visually consistent series cannot establish cause, diagnosis, severity, treatment effect or whether a condition is improving or deteriorating.
The protocol is first-party organisational guidance, not a validated clinical photography method. It does not provide condition-specific timing, measurement rules or urgency thresholds. A visible image may omit symptoms that are felt rather than seen, and it cannot capture the full context a healthcare professional may need.
Privacy controls also have limits. A tightly framed photograph can still be sensitive. Local storage reduces some forms of transfer but does not by itself prevent access by someone who can unlock the device, inclusion in a device backup, or disclosure after export or sharing. Check the actual settings and destination relevant to your device and situation.
Most importantly, do not use a photo schedule, comparison label or retake decision to postpone care. Seek appropriate professional or emergency help based on the situation, not on whether the next image can be captured consistently. Genetiqo Vault records information entered by the user; it does not diagnose, prescribe, recommend treatment or provide emergency care.
FAQ
How often should I take a photo note?
There is no universal interval in this protocol. Use a schedule given by an appropriate healthcare professional, if one has been provided. Otherwise, choose a practical recording plan that does not replace care, and note unscheduled captures rather than forcing them into the regular series.
Should I use flash?
This workflow does not claim that flash is clinically preferable. Choose one repeatable lighting arrangement that keeps the intended area visible, record it on the setup card and document exceptions. Retake if glare or shadow obscures the view and doing so will not delay help.
Can I measure the symptom from the photograph?
Treat the neutral reference as a framing and consistency cue, not as proof of exact dimensions. Camera angle, distance, perspective and reference placement can all affect apparent size. If measurement matters, ask a healthcare professional what method and units are appropriate.
Should I edit or enhance the image?
Keep the unedited original. Avoid filters, colour changes, smoothing and other appearance-changing edits. If you make a crop for convenience, retain the original and label the crop so the alteration is clear.
What if I cannot reproduce the setup?
Take the photo only if it is still useful and safe to do so, then record the exact differences and label it “usable with caution” or “not comparable”. Start a new setup card if the old arrangement is no longer practical; do not pretend the two series use the same standard.
Can a consistent series tell me whether the symptom is serious?
No. Capture consistency is an organisational quality, not a clinical assessment. Direct questions about diagnosis, seriousness, cause, change or treatment to an appropriate healthcare professional. Seek emergency help when the situation requires it rather than waiting for another photo.